Use Python to Control Lights on a Raspberry Pi
Today we'll learn how to hook up the Raspberry Pi to some buttons and LEDs.
Learning Targets
- I understand and can explain how the Pi Wedge connects to the Raspberry Pi and its purpose.
- I can write a Python script to get input and output from the Raspberry Pi pins.
Procedure
- Hook the Raspberry Pi’s up to the monitor, keyboard, and mouse.
- Ensure that the Raspberry Pi is connected to the wifi network (optional but helpful).
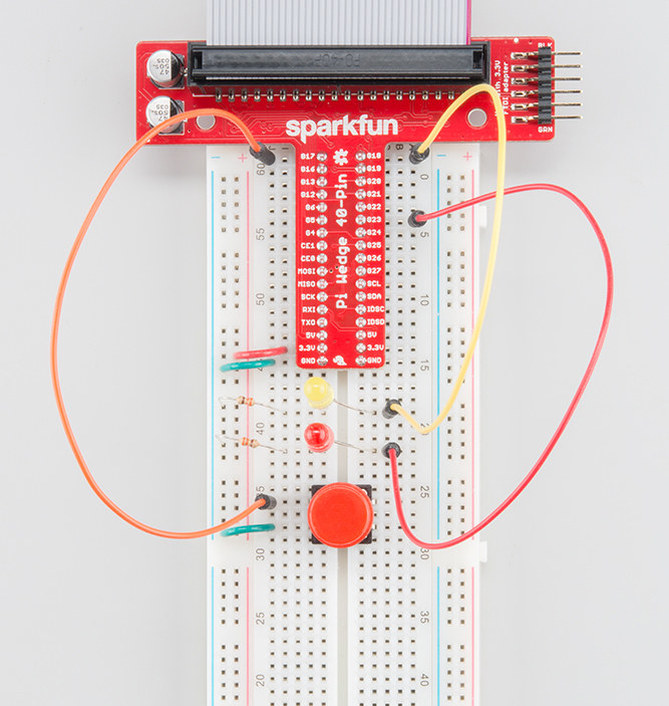
- Attach the Raspberry Pi to the breadboard using the Pi Wedge adaptor board.
- Ensure that the button, LED lights, and resistors are all in the correct locations on the breadboard.
- Attach the correct wires from the button and LEDs to the pins on the Pi Wedge.
- Start the Python 2 program, choose File->New Window and input the program provided below. Save the program as "pyled.py".
- Start the Raspberry Pi terminal program and run the Python program using the following command:
sudo python pyled.py - Modify the program to explore how the Python commands interact with the hardware.
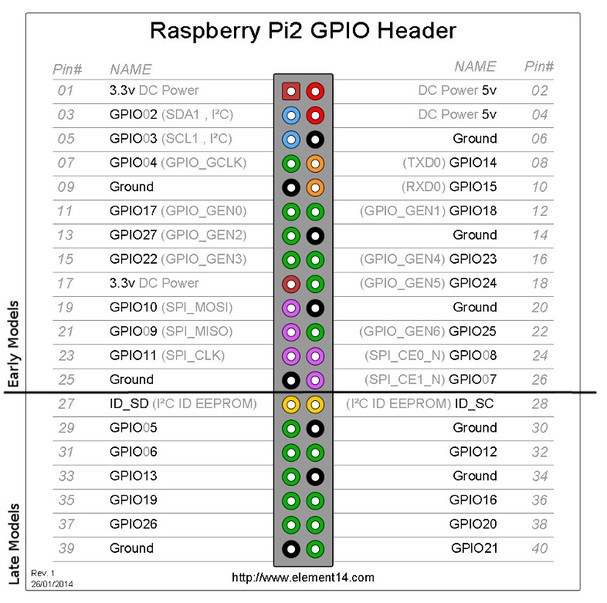
We're going to attach our button to GPIO17 and our LEDs to GPIO18 and GPIO23.
pyled.py Program
# External module imports
import RPi.GPIO as GPIO
import time
# Pin Definitons:
yellowPin = 18 # Broadcom pin 18 (P1 pin 12)
redPin = 23 # Broadcom pin 23 (P1 pin 16)
butPin = 17 # Broadcom pin 17 (P1 pin 11)
# Pin Setup:
GPIO.setmode(GPIO.BCM) # Broadcom pin-numbering scheme
GPIO.setup(redPin, GPIO.OUT) # redPin set as output
GPIO.setup(yellowPin, GPIO.OUT) # yellowPin set as output
GPIO.setup(butPin, GPIO.IN, pull_up_down=GPIO.PUD_UP) # Button pin set as input w/ pull-up
# Initial state for LEDs:
GPIO.output(redPin, GPIO.LOW)
print("Here we go! Press CTRL+C to exit")
try:
while 1:
if GPIO.input(butPin): # button is released
GPIO.output(yellowPin, GPIO.HIGH)
GPIO.output(redPin, GPIO.LOW)
else: # button is pressed:
GPIO.output(yellowPin, GPIO.LOW)
GPIO.output(redPin, GPIO.HIGH)
time.sleep(0.075)
GPIO.output(redPin, GPIO.LOW)
time.sleep(0.075)
except KeyboardInterrupt: # If CTRL+C is pressed, exit cleanly:
GPIO.cleanup() # cleanup all GPIO
Things to try:
- Change the yellow to flashing, and the red to solid.
- Make both LEDs turn on when the button is pressed.
- Turn on one of the LEDs after a random amount of time, and then measure how long it takes a person to press the button.
Reference